Your extension is finally finished, walls pristine, kitchen island gleaming, and now the thought of someone chasing cables through it all makes you feel physically sick.
Or perhaps you’re still in the planning stages, trying to work out which solution fits your build programme and what power each one actually needs.
Either way, you’re in the right place.
WindowTreat installs four distinct types of shading solution, and each one follows a fundamentally different installation and power path. Electric blinds, 3M window film, electric awnings, and Blindspace concealed systems don’t all require the same trades, the same power sources, or the same level of structural planning. Understanding these differences before you commit saves time, money, and a great deal of frustration.
This guide walks you through exactly what each installation involves, honestly. We’ll explain who needs an electrician, who doesn’t, what can be fitted in a finished room with zero damage, and what absolutely must be planned during the build.
Our goal is to educate you so you can make the best decision. Even if that means you don’t choose us.
Key Insights from This Guide:
- The running cost of a mains-powered electric blind is roughly 18 pence per year: less than a single takeaway coffee
- 3M window film requires no power source at all and no structural changes, it’s applied directly to the glass by a specialist using a precision wet process
- Electric awnings are external installations requiring dedicated mains power and structural fixings that are fundamentally different from anything fitted inside your home
- Blindspace® concealed systems must be built into the architecture during construction, once the plaster is dry, that specific ship has sailed
- A specialist installation follows a structured, protective process, understanding what that actually looks and feels like removes the anxiety
Quick Reference: Installation and Power at a Glance
| Factor | Electric Blinds | 3M Window Film | Electric Awnings | Blindspace® |
| Power source | Mains (hardwired) or battery/solar | None required | Dedicated mains (weatherproof fused spur) | Mains (via first-fix wiring) |
| Best fitted | Finished rooms (battery) or new builds (mains) | Any time, finished rooms ideal | During build or to existing exterior walls | During construction only (first fix) |
| Disruption level | Zero (battery) to moderate (hardwired retrofit) | Minimal, no building work | Moderate, external structural fixings | None if planned early; major if retrofitted |
| Typical trades involved | Blind specialist; electrician if hardwired | Film application specialist only | Electrician, structural fixer, blind specialist | Builder, electrician, plasterer, blind specialist |
| Retrofit friendly? | Yes (battery); harder (hardwired) | Fully, it’s designed for existing glazing | Yes, with proper structural assessment | No, requires structural pockets in ceiling/wall |
Detailed breakdown of each solution below.
What Do We Mean by “Installation and Power”?
Every shading solution has its own installation process, its own power requirements, and its own set of trades involved. Some need an electrician. Some don’t need power at all. Some must be coordinated with your builder months before plastering. Others can be fitted in an afternoon with zero wall damage.
This guide covers all four, so you can see clearly which path suits your home, your project stage, and your comfort with disruption.
Why Trust This Guide?
WindowTreat is SafeContractor accredited, a member of the British Blind and Shutter Association, and Trading Standards approved through the Buy With Confidence scheme. Our installers carry £5 million in public liability insurance and use HSE-standard dust extraction on every job. We’ve installed high-performance shading solutions across hundreds of architecturally designed homes in the UK, from single roof lanterns to full-extension systems combining blinds, film, and external shading.
What We Will Cover in This Guide:
If mess is your main worry, start with the electric blinds section. If you’re still in the planning stages, jump straight to Blindspace. If you want the least disruptive option for a finished room, the window film section is your starting point.
- Electric blinds: installation process, power options, and retrofit reality
- 3M window film: a completely different category
- Electric awnings: external installation and dedicated power
- Blindspace® concealed systems: designing shading into the architecture
- Who should NOT attempt a complex installation
- Frequently asked questions about installation
- Your next step
- All installation and power articles
Electric Blinds: Installation Process and Power Options
Electric blinds are our core product, and for most homeowners, the installation questions centre on two things: how much disruption will there be, and how do I get power to the motor?
The honest answer depends entirely on whether your room is already finished or still being built.
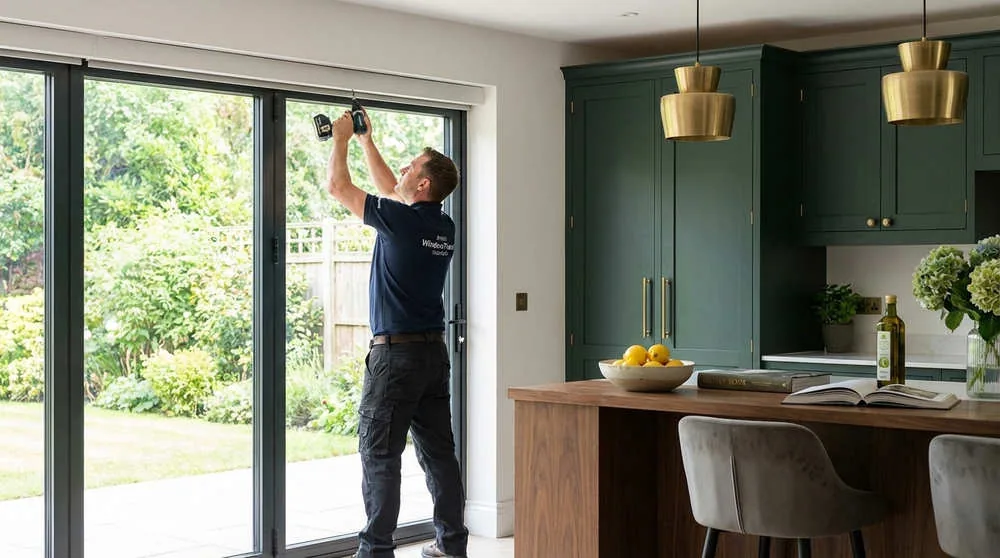
What a Professional Installation Actually Looks and Feels Like
Having fitted hundreds of electric blind systems, we know the number one fear is mess. Homeowners picture plaster dust settling on a brand-new worktop. They imagine scuff marks across freshly painted walls.
A specialist process is built from the ground up to prevent exactly that.
The very first thing our team does on arrival is protect your home. Dust sheets cover floors and surfaces, and barriers isolate the work area completely.
Tools fitted with on-tool dust extraction capture debris at the source. This follows Health and Safety Executive best practice for working in occupied homes.
It isn’t a “nice to have.” BBSA membership and SafeContractor accreditation demand it.
Understanding the specialist blind installation process from first call to final fitting removes the guesswork entirely, you’ll know what happens at every stage. Knowing what’s actually included means you can compare quotes accurately and avoid being surprised by hidden costs.
The process starts long before installation day. A detailed consultation and site survey ensures every measurement is precise. Nothing is guessed or approximated, you won’t end up with a blind that doesn’t fit or a power solution that doesn’t suit your room.
Your blind is manufactured to those exact dimensions, only then does the fitting team arrive.
After fitting, the team tests every function: motor limits are set precisely, and smart integrations are configured and demonstrated.
A thorough clean-up leaves your space spotless. The job isn’t finished until you’re comfortable with how everything works.
Powering Your Blinds: Hardwired vs Battery
This is the decision that determines how disruptive your installation will be. Get it right, and fitting becomes straightforward. Get it wrong, and you could face weeks of remedial trades, costly rework, or a system that simply can’t be installed in your home.
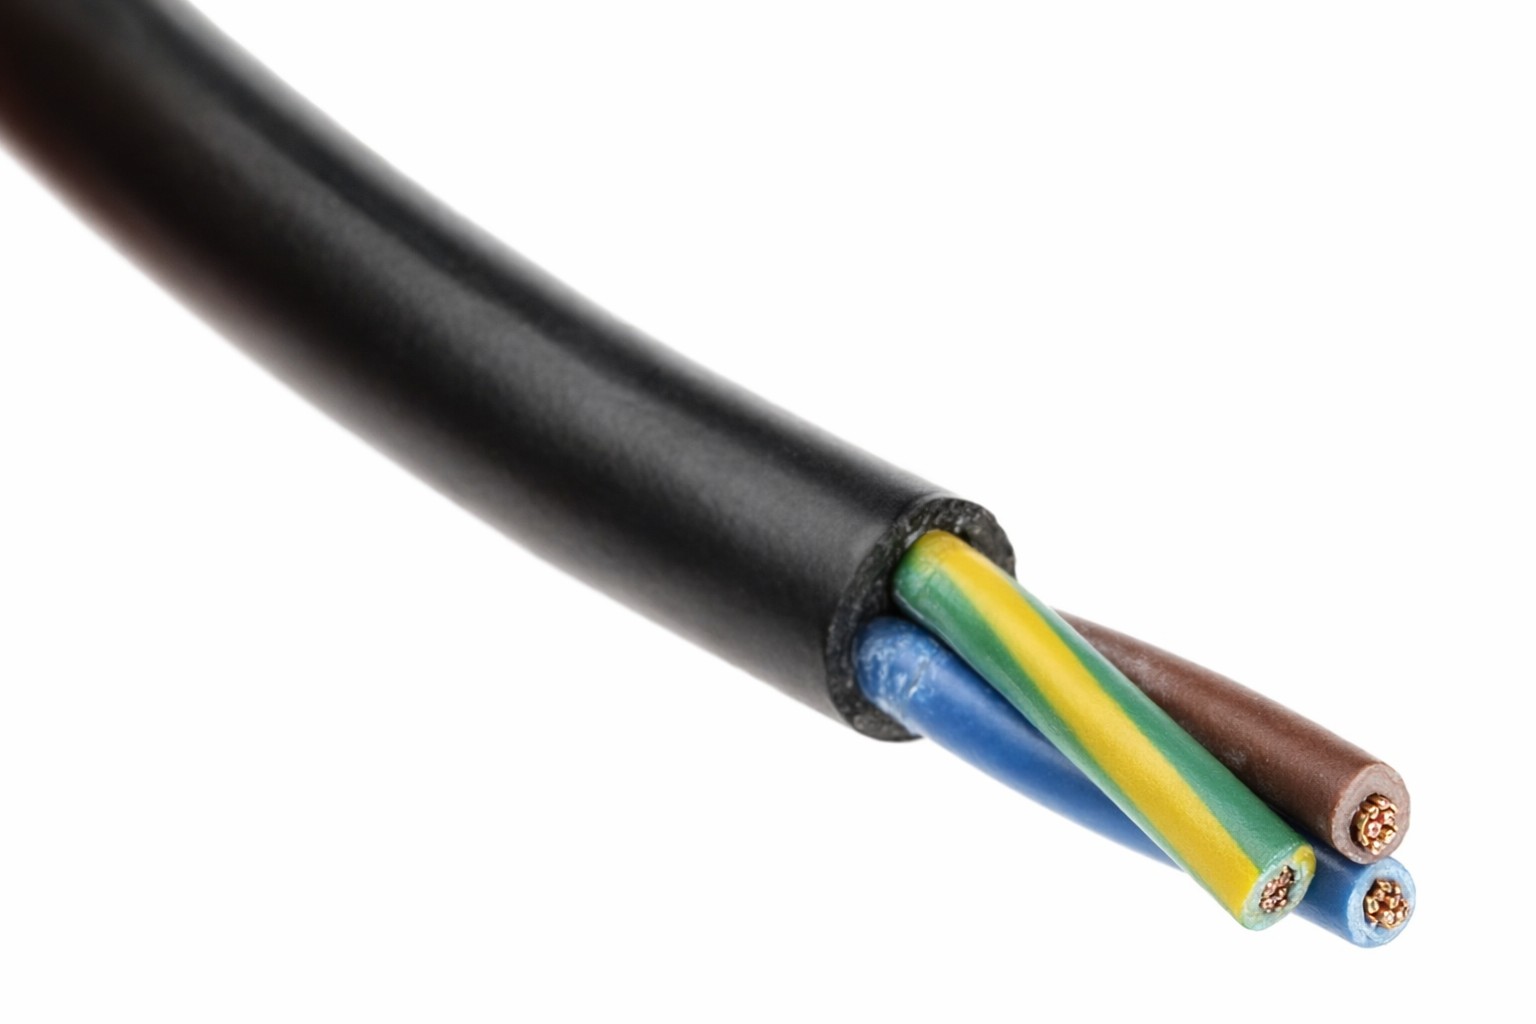
Hardwired (Mains Power)
A mains-powered blind connects to a dedicated fused spur in your electrical circuit. The motor receives constant power. There’s nothing to charge. Ever.
The running cost is remarkable. A typical Somfy motor operating daily costs roughly 18 pence per year.
Think of it like this. Ten electric blinds running for an entire year use less electricity than a single dishwasher cycle.
The catch? In a finished room, that fused spur probably doesn’t exist yet.
Installing one means an electrician chasing a cable into your wall. Then a plasterer making good. Then a decorator matching the paint.
Here’s what those ancillary costs actually look like:
| Trade Required | Typical Cost |
| Electrician (new fused spur) | £150–£300 |
| Plasterer (making good) | £80–£150 |
| Decorator (colour matching) | £100–£200 |
| Total ancillary costs | £330–£650 |
That’s on top of the blind itself. In a new build at first-fix stage, these costs drop dramatically because wiring happens alongside the main electrical work.
Battery and Solar Power
Modern battery technology has transformed the equation entirely.
Today’s lithium-ion batteries from manufacturers like Somfy deliver six to twelve months of daily use on a single charge. The motors are powerful enough for large, heavy blinds across spans of several metres.
Recharging takes a few hours overnight, roughly once a year. A small solar panel can trickle-charge the battery, potentially eliminating the need to plug in altogether.
The critical advantage? Zero wall damage. No chasing. No plastering. No redecorating.
Discovering how to power electric blinds in a finished room without wrecking the walls is often the turning point. Many homeowners assumed their pristine room ruled out electric blinds entirely.
When Each Option Makes Sense
Choose hardwired if your project is a new build or major renovation. The wiring becomes part of the electrical first fix at minimal extra cost. Discuss with your shading specialist the type of cabling you may need for your project.
Choose battery if your room is finished and you want a clean installation. The technology has matured, it’s genuinely no longer a compromise for most homes.
Retrofitting Electric Blinds: The Honest Pros, Cons, and What to Expect
In our experience, most homeowners come to us after the build is finished. The extension is complete. The plaster is dry. Then they experience their first unbearably hot or blindingly bright day.
Retrofitting is not a second-rate fix. But it does involve honest trade-offs.
The Two Paths: “Invisible” vs “Elegant”
An invisible concealed system, like the Blindspace® installation we describe further down this guide, requires structural pockets built during construction. Once the plaster is dry, that specific ship has sailed.
Concealing the system in a finished ceiling is possible, but it involves destructive and expensive building work.
The alternative is an elegant retrofit. A precision-engineered aluminium cassette is fitted to the wall or ceiling above the window.
When powder-coated to match your frames, the common RAL 7016 Anthracite Grey, for example, it looks deliberate. Sophisticated. Intentional.
It’s not invisible. But it’s far from the clunky, bolt-on look most people fear.
The Real Danger: Choosing a Cheap Retrofit
This is where we see the most heartbreak.
Understanding what to know about retrofitting electric blinds honestly can save you thousands and months of frustration.
We worked with Duone and Simon from Dorset. They had avoided adding blinds to their garden room for ten years. The heat and glare were unbearable.
They told us they had to wear sunglasses indoors just to see each other across the dining table. Their dream space was unusable.
They’d looked at traditional blinds but found them unsightly. Wires cluttered the glass panels. Fabrics trapped flies.
When they came to us, we installed a high-performance battery-powered roof blind system. Zero wall damage. No mess. No chasing cables through their beloved finished room.
The transformation was remarkable. Their garden room finally became the comfortable, usable space they’d planned a decade earlier.
Their story proves something important: a quality retrofit doesn’t require destruction.
But a cheap one almost always leads to disappointment. We often see homeowners who chose a budget alternative and called us months later, asking us to rip it out.
The fabric sagged. The finish looked terrible. They ended up buying twice, the most expensive option of all.
3M Window Film: A Completely Different Installation Category
If electric blinds are a mechanical installation, window film is closer to a precision craft. The two share almost nothing in common when it comes to how they’re fitted.
No power. No motors. No wiring. No structural changes.
3M window film is applied directly to the glass itself by a trained specialist. There’s no electrician involved, no plasterer, no decorator. It’s an entirely different process, and for many homeowners, particularly those who want the absolute minimum disruption to a finished room, it’s the most appealing installation of all.
What the Installation Actually Involves
The process is meticulous but non-invasive.
Glass preparation comes first. The specialist thoroughly cleans every pane using stainless steel scrapers to remove debris that’s invisible to the naked eye. Even microscopic particles trapped beneath the film would create visible imperfections, so this stage can’t be rushed.
Application uses what’s known as a “slip solution,” a carefully mixed combination of water and mild detergent. The film is floated onto the wet glass surface, which allows the specialist to position it precisely before committing.
Squeegeeing follows, applying firm, even pressure to bond the film to the glass and force out any remaining water or air. This is the stage that determines the final quality. Done properly, the film is optically clear and seamless. Done poorly, bubbles and wrinkles are locked in permanently.
Then comes curing. This is the part that catches most homeowners off guard. The film needs up to 30 days to reach full adhesion. During this curing period, small water bubbles or a slight haziness may appear. This is completely normal and temporary, they vanish as the moisture evaporates through the film.
The key point? Your room is fully usable throughout. There’s no dust, no drying plaster, no wet paint. Life carries on as normal while the film quietly cures.
Interior vs Exterior Application
Not all film goes on the inside of the glass. For modern double glazing, particularly in conservatories and extensions, the specialist may recommend external application.
The reason is physics. Standard solar film applied internally absorbs heat, which then radiates into the sealed glazing unit. On certain glass types, this heat build-up can cause thermal stress and, in extreme cases, cracking.
An external film like 3M Prestige 70 rejects heat before it enters the glass unit, preventing that build-up entirely. It’s a critical distinction, and one that a specialist assessment determines before any film is ordered.
External films require edge sealing with silicone to prevent water getting behind the film. Their lifespan is typically around ten years compared to fifteen to twenty for internal films, because they’re exposed to the elements. But for high-performance heat rejection on double-glazed extensions, exterior application is often the superior choice.
Why Professional Installation Matters for Film
This isn’t a DIY product. Budget films bought online often use dyed layers that purple and fade within a few years. The adhesive bubbles. The finish deteriorates.
3M’s multi-layer nanotechnology films are colour-stable and optically clear, but they demand professional handling. Incorrect application on the wrong glass type can void the warranty and, worse, risk thermal stress fracture.
WindowTreat assesses your specific glazing type, orientation, and thermal profile before recommending a film. If film isn’t suitable for your glass, we’ll tell you. That honesty is worth more than a sale.
Electric Awnings: External Installation and Dedicated Power
Electric awnings are the one solution on this list that lives entirely outside your home. That changes everything about how they’re installed, what power they need, and what trades are involved.
If you’re comparing awning installation to internal blind installation, stop. They’re fundamentally different projects.
How an Electric Awning Is Fitted
An electric awning is a substantial piece of engineering. A full-cassette system like the ones we install from Caribbean Blinds, Markilux, or Weinor weighs considerably more than an internal blind, and it’s subject to dynamic forces from wind that internal products never face.
Structural fixings are the foundation of a safe awning installation. The system is mounted to your exterior wall using resin-bonded chemical fixings, not expanding foam or standard rawl plugs. This is critical. An awning acts like a sail in the wind, and inadequate fixings can rip the mounting brackets clean off the wall, damaging the fascia and potentially injuring someone below.
For single-storey extensions, which are extremely common in the UK, the brickwork above bifold doors often isn’t strong enough to bear the load directly. In these cases, spreader plates or cantilever brackets are used to distribute the weight onto the structural lintel or the masonry course above. This additional structural work can add £500 £2,000 to the installation cost, but it’s non-negotiable for safety.
Power Requirements
Every electric awning requires a dedicated mains power supply via a weatherproof fused spur. There’s no battery option here, the motors need constant power to operate the retraction mechanism and, critically, to respond to automated wind sensors.
If there isn’t an existing outdoor power point near the mounting location, an electrician will need to run a new fused spur from your consumer unit. Depending on the distance and the route the cable needs to take through your home, this typically costs £150 – £500.
Wind and vibration sensors are an essential part of the installation. These automatically retract the awning when wind speeds exceed safe thresholds. A vibration sensor mounted on the front bar detects the actual movement of the awning itself, offering better protection than a wall-mounted wind paddle alone.
What Makes Awning Installation Different
The honest reality is that an electric awning installation involves exterior scaffolding or access equipment, structural assessment of the mounting surface, weatherproof electrical connections, and careful calibration of sensors and motor limits.
It’s not something that can be done discreetly in a couple of hours. But it’s also not disruptive to the inside of your home. Your kitchen stays clean. Your walls stay untouched. The work happens outside.
Helen and Michael in Peckham discovered this when their architect-designed kitchen with extensive roof glazing became unbearably hot. They’d searched for years for a solution that would control the heat without sacrificing the bright, airy feel they loved. We helped them see that the most effective approach was to stop the heat before it even reached the glass. Their external roof blind, The Artemis, blocks over 90% of heat gain from the outside. The room remained bright yet comfortably cool, and the interior was never touched during installation.
Blindspace® Concealed Systems: Designing Shading into the Architecture
This is the gold standard. And it’s the one that requires the most planning.
Blindspace is not a product you buy after the build. It’s a construction component that must be integrated into the fabric of your home during the build itself. Get the timing right, and the result is shading that’s genuinely invisible. Miss the window, and it becomes extremely difficult and expensive to achieve the same result.
What Blindspace Actually Is
Blindspace is a standardised system of extruded aluminium concealment boxes. They’re designed to be recessed into your ceiling or wall cavity so that when the blind retracts, it disappears completely behind a flush-fitting hinged cover. All you see is a hairline gap in the ceiling, barely wider than a plaster crack.
The boxes come in standard sizes (the S100x100 and S130x130 models) for most applications and custom C-Series configurations for complex scenarios like dual blinds, skylights and roof lanterns.
Unlike a DIY timber pocket, which a builder might offer to construct from plasterboard, the Blindspace system features precision-engineered skim coat flanges. These allow the plasterer to feather the ceiling finish right up to the aluminium edge, creating a seamless join. Once painted, the box blends completely with the surrounding ceiling. The pocket needs to be created for concealment whether you invest in the unarguable superior finish of Blindspace or create your own cover.
The Installation Process
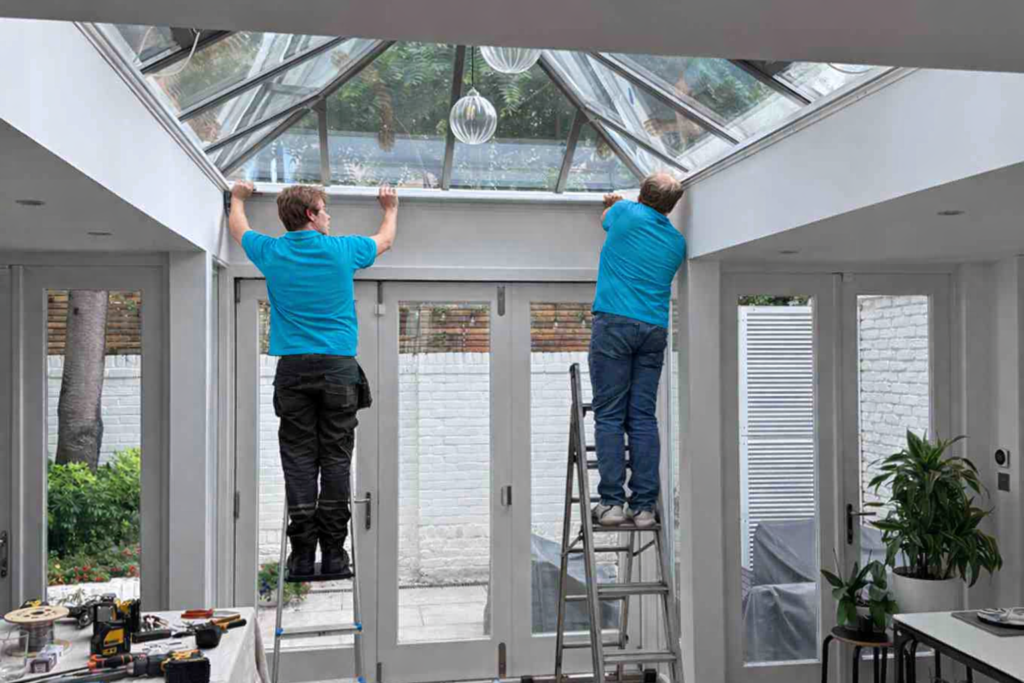
Blindspace installation happens in stages, coordinated across multiple trades.
Stage one is specification. Before any bricks are laid, your architect needs to know that concealment pockets are required. The critical issue is the lintel. In modern UK construction, structural steels are often placed directly above window openings. If the lintel sits immediately above the glass, there’s no space to recess a 130mm deep Blindspace box. The architect must specify raised or split lintels to create the necessary structural void. This decision must happen before construction begins.
Stage two is first-fix installation. Once the structural shell is up and the ceiling joists are in place, the Blindspace boxes are screwed into the substrate and aligned with millimetre precision. Any misalignment means the cover flaps won’t sit flush, and the clean linear aesthetic is lost. At this same stage, the electrician runs a dedicated power spur to the concealment pocket, because Blindspace systems are almost always mains-powered for maximum motor torque and reliability.
Stage three is plastering. The builder’s plasterer applies scrim tape over the skim coat flanges and skims the ceiling right up to the box edge. The result, once painted, is invisible.
Stage four is the blind itself. We return after the decorating is complete to install the motor, fabric, and controls into the pre-built pocket. Testing, calibration, and smart home configuration happen at this final stage.
The Pavla and Piers Story
We worked with Pavla, an architect, and Piers, a structural engineer, on their own home in Fulham. Their master bedroom featured a large rooflight designed for stargazing from bed.
The blind had to be completely concealed within the ceiling, total room darkening without disrupting their minimalist aesthetic.
Because we were involved early, concealment pockets were built into the ceiling during first fix. The electrician ran a dedicated power spur at the same time.
The result? A blind that emerges silently from a hidden slot. When retracted, it vanishes completely.
Piers particularly loves the theatrical reveal as it glides open to expose the night sky.
That level of seamless integration is only possible with early planning. It’s the core idea behind our S.H.A.D.E. principle, treating shading as part of the architecture, not an afterthought.
Can Concealment Be Retrofitted?
We get asked this constantly. The honest answer is: technically yes, but practically, it’s rarely worth it.
Retrofitting Blindspace into a finished room means cutting a strip out of the ceiling, potentially cutting into ceiling joists (which requires structural engineering approval), re-plastering the entire ceiling to hide the patch, and full redecoration.
For most homeowners with a finished room, a high-quality colour-matched surface cassette is the smarter, more cost-effective choice. It’s not invisible, but when powder-coated to match your window frames, it looks deliberate and refined. Electric Blinds After the Build: How to Still Get A Premium Finish
If you’re currently working with an architect or builder and haven’t yet finalised the ceiling construction, this is your moment. Specifying Blindspace now costs a fraction of what retrofitting it later would involve, and the result is incomparably better.
Who Should NOT Attempt a Complex Installation
Being honest about this builds more trust than any sales pitch ever could.
Do not attempt a DIY installation if:
- Your blind spans more than two metres and must be fitted at height, the safety risk of working on ladders with heavy aluminium is serious
- You’re fitting a concealed system into a structural pocket, misalignment by even a few millimetres ruins the seamless finish
- Your roof lantern sits above a kitchen island or stairwell, specialist access equipment is essential, not optional
- The motor requires hardwiring to a fused spur, this is legally a job for a qualified electrician
A simpler blind might be the smarter choice if:
- The window is small, standard-sized, and easily accessible from the floor
- Your primary need is basic privacy rather than high-performance heat management
- Budget is the overriding concern and you accept the aesthetic trade-offs
Professional installation protects your warranty. Most premium manufacturers, including Somfy, specify professional fitting as a condition of their five-year warranty. A botched DIY attempt can void that protection entirely.
The reality is, a three-metre blind in a four-metre-high roof lantern is not a weekend project. It demands proper equipment, precise motor calibration, and experience with tensioning systems.
Getting this wrong doesn’t just look bad, it can damage the motor, the fabric, and the structure it’s fixed to.
The Bottom Line on DIY
We’d rather you bought a simpler product and fitted it safely than attempted a complex installation and ended up with a damaged blind, a voided warranty, and a ceiling that needs repairing. If the job is beyond your comfort zone, that’s not a failing, it’s good judgement.
Frequently Asked Questions About Installation
How long does a typical electric blind installation take?
Most single-blind installations take two to five hours. A full-room project with multiple blinds, roof lantern plus bifold doors, might take a full day or more. Manufacturing happens weeks before, so installation day itself is efficient.
Will installing electric blinds damage my walls or ceiling?
A battery-powered retrofit usually creates zero wall damage. A hardwired installation in a finished room does require chasing for the cable, which means plastering and repainting a section. In a new build, the wiring is hidden inside the wall, so there’s no visible impact.
How long does window film installation take?
The application itself typically takes a few hours depending on the number and size of panes. The film then needs up to 30 days to fully cure. During that time, small water bubbles or slight haziness may appear and then disappear. Your room is fully usable throughout. Watch Mike installing 3M Prestige Exterior to these bi-fold doors
Does window film work on all glass types?
Not always. Certain combinations of film and glass (particularly laminated glass, triple glazing, or heavily tinted double glazing) can create thermal stress. A specialist assessment of your specific glazing is essential before any film is specified. If film isn’t suitable for your glass, we’ll tell you.
What power does an electric awning need?
A dedicated mains supply via a weatherproof fused spur. There’s no battery option for awnings because the motor needs constant power for automated wind-sensor retraction. If you don’t have an outdoor power point near the mounting location, an electrician will need to run one.
Is it truly too late for Blindspace concealed blinds in a finished room?
True Blindspace® concealment requires pockets built during construction. In a finished room, it’s technically possible but involves cutting the ceiling, structural work, and full re-plastering. For most homeowners, a high-quality colour-matched surface cassette is the smarter choice.
How often do battery blinds need recharging?
Typically every six to twelve months with normal daily use. Recharging takes a few hours via a simple charger. Adding a small solar panel can extend this significantly or even eliminate the need to plug in altogether.
What if something goes wrong during installation?
Our installers carry £5 million in public liability insurance. If accidental damage occurs, we acknowledge it immediately and arrange professional repair at our cost. We don’t ask you to accept compromises.
Can I add electric blinds to windows that already have manual blinds?
Yes. We remove the existing blind as part of the project. If it involves a more complex existing electric system, removal typically costs £50 – £200 depending on the setup.
Your Next Step
Every home is different. A finished room with no power points near the glazing needs a different approach from a new build still at first-fix stage. A conservatory overheating through the glass itself calls for a different solution than a roof lantern that needs motorised shade.
The right combination might be a single product or several working together. Electric blinds paired with window film. An external awning handling the heat while internal blinds manage privacy. Blindspace pockets specified now, saving thousands compared to retrofitting later.
A short conversation is the fastest way to work out which path suits your home and your project stage.
If your beautiful extension is finished and the comfort isn’t right, battery-powered electric blinds or 3M window film can be fitted cleanly, professionally, and without a single drill hole in your pristine walls.
If you’re still in the planning stages, that’s even better. Early involvement means we can coordinate concealed pockets, first-fix wiring, and external shading with your builder, so nothing is left to chance.
We’re not the right fit if you just need a basic blind for a small window. A high-street option would serve you perfectly well for that.
But if you’ve invested significantly in a beautiful glazed space and want a solution that matches that level of care, we’d welcome the conversation.
Book a free call back to start to explore your options.
Or call 01256 345580 for a friendly chat about installation options. No pressure. No obligation.
All Installation and Power Articles
Understanding the Process
- What is the actual installation process for specialist blinds, from first call to final fitting?, A step-by-step guide to what happens before, during, and after installation day, including how your home is protected throughout.
Powering Your Blinds
- How do you get power to electric blinds in a finished room without wrecking the walls?, The clean battery and solar alternatives that eliminate the need for cable chasing, plastering, and redecorating.
Retrofit Reality
- What should I know about retrofitting electric blinds? Pros and cons, An honest look at what’s possible in a finished room, the trade-offs involved, and how to avoid the costly mistake of buying twice.